SUPER CHOC FUDGE BROWNIES
Oh boy. Oh man. Oh dear. You guys. So when I was in Uni and for the couple of years afterwards I got really into baking. I would bake all sorts of things; mostly cupcakes of varying flavours and mostly to share with my friends under the guise of some kind of international day of something or other. But really because I love to bake. I love the mess that you make all over your kitchen, I love the joy of hand mixing things. Baking is basically alchemy and since I was never good enough at science to actually pursue it in career form I definitely have to settle for the relatively harmless kitchen version. Long story short whenever I went on a roadtrip I would make brownies. It was tradition. My friend Kaitlyn would come over and we'd stay up until 2 in the morning until we were actually delusional from tiredness and we'd make up weird combinations of things to throw in and would name them things like "Ultimate Sleepover Brownies" or "Bees Knees Brownies" and all my memories of those baking times are so warm and happy that I will always love making brownies. Which I haven't done much at all since, however last weekend I set off on a three day roadtrip around the north of Scotland with a couple of other Australian Au Pairs and I had to uphold tradition you guys. I had to make brownies. So I did. I don't have any of my old recipes with me (I'm a write it down on paper type person) so I had to do a google to find a recipe close to mine, eventually settling on this one by King Arthur Flour.
The brownies turned out great and went down really well, so well in fact that the girls asked for the recipe and that I made a second batch during the week to share with you all here. So let's get into it hey.
INGREDIENTS:
4 LARGE EGGS
3/4 CUP COCOA POWDER
1tsp SALT
1tsp BAKING POWDER
1tsp COFFEE POWDER (optional but great for an energy boost)
1tbsp VANILLA EXTRACT
2 CUPS SUGAR (half that if using stevia or other dry alternative)
225gms BUTTER (unsalted)
1 1/2 CUPS PLAIN FLOUR
1 - 2 CUPS CHOCOLATE CHIPS
You can also add any extras you like for example: broken up biscuits, nuts, cookable lollies, chocolate bars, seeds, or even dollops of your favourite spreads! Go nuts! I actually added some toffeed pre-popped popcorn to part of my batch.
METHOD:
1. Preheat the oven to 180°c or 356°f fan forced. Prep your tin (I've made brownies in cake tins before if you don't have a brownie pan, you can even make them in muffin trays if you're desperate but they'll cook quicker so adjust accordingly!) I usually just use a bunch of grease proof baking paper to save on washing up and prep time.
2. Crack the eggs into a large bowl and beat them. Then add the vanilla, salt and baking powder (and coffee powder) the baking powder will potentially react to the liquids, don't worry that's fine. Then pop in the cocoa powder (or drinking chocolate if you've got nothing else) and mix on a low to medium speed for a few minutes.
3. Melt the butter in a medium sized bowl in the microwave until completely melted and quite hot. Pour in the sugar and mix it in, dissolving the sugar. You may need to pop the mixture back in the microwave to heat it further. The more thoroughly you dissolve the sugar the shinier the top of the brownie will be. You can also do this on the stove top if you don't have a microwave, just be sure not to boil the mixture.
4. Add the still hot sugary butter to the rest of the batter and mix until smooth (and probably very shiny and enticing) scrape down the sides of the bowl if anything escapes and mix it in.
5 + 6. Finally add the flour and chocolate chips (and other extras you've chosen - except spreads) and mix until combined.
7. Spoon or pour into a tray depending on how thick your mixture is (it should be kinda goopy but not super runny) if adding spreads pour a layer of brownie mixture on the bottom of the tray then add the dollops of spread to the mix and pour in more brownie mix, swirling the spread through the batter.
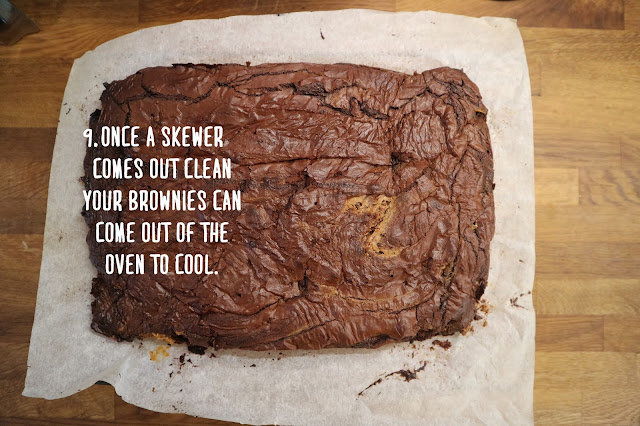
8. Pop it in the oven for around 30 minutes. Depending on how deep your tray is the cooking time will vary. I checked mine at 25 minutes and the larger, shallower tray was perfectly cooked while the smaller deeper tray required a further 10 minutes. When checking the brownies remember that if there is an excessive amount of chocolate drops and things in the mix sometimes the skewer will hit that and come out with the gooey chocolate when the brownie itself is cooked so poke a few holes!
9. Let sit in tray for a few minutes before popping on a wire rack to cool. If you just used baking paper you can pretty much just lift the massive brownie out and onto the rack without hassle.
10. Once the brownie is cool enough chop that badboy up! I cut my pieces quite small so that more people have an opportunity to have a taste but you can make them more generous if you prefer.
Let me know if you made these and if they work for you. Also feel free to share your weirdest or favourite combination of add ons. For example the Ultimate Sleepover Brownies contain chopped up red frog lollies, peanuts, small cooking marshmallows and popcorn.
xoxo
Lily Pie.
The brownies turned out great and went down really well, so well in fact that the girls asked for the recipe and that I made a second batch during the week to share with you all here. So let's get into it hey.
INGREDIENTS:
4 LARGE EGGS
3/4 CUP COCOA POWDER
1tsp SALT
1tsp BAKING POWDER
1tsp COFFEE POWDER (optional but great for an energy boost)
1tbsp VANILLA EXTRACT
2 CUPS SUGAR (half that if using stevia or other dry alternative)
225gms BUTTER (unsalted)
1 1/2 CUPS PLAIN FLOUR
1 - 2 CUPS CHOCOLATE CHIPS
You can also add any extras you like for example: broken up biscuits, nuts, cookable lollies, chocolate bars, seeds, or even dollops of your favourite spreads! Go nuts! I actually added some toffeed pre-popped popcorn to part of my batch.
METHOD:
1. Preheat the oven to 180°c or 356°f fan forced. Prep your tin (I've made brownies in cake tins before if you don't have a brownie pan, you can even make them in muffin trays if you're desperate but they'll cook quicker so adjust accordingly!) I usually just use a bunch of grease proof baking paper to save on washing up and prep time.
2. Crack the eggs into a large bowl and beat them. Then add the vanilla, salt and baking powder (and coffee powder) the baking powder will potentially react to the liquids, don't worry that's fine. Then pop in the cocoa powder (or drinking chocolate if you've got nothing else) and mix on a low to medium speed for a few minutes.
3. Melt the butter in a medium sized bowl in the microwave until completely melted and quite hot. Pour in the sugar and mix it in, dissolving the sugar. You may need to pop the mixture back in the microwave to heat it further. The more thoroughly you dissolve the sugar the shinier the top of the brownie will be. You can also do this on the stove top if you don't have a microwave, just be sure not to boil the mixture.
4. Add the still hot sugary butter to the rest of the batter and mix until smooth (and probably very shiny and enticing) scrape down the sides of the bowl if anything escapes and mix it in.
5 + 6. Finally add the flour and chocolate chips (and other extras you've chosen - except spreads) and mix until combined.
7. Spoon or pour into a tray depending on how thick your mixture is (it should be kinda goopy but not super runny) if adding spreads pour a layer of brownie mixture on the bottom of the tray then add the dollops of spread to the mix and pour in more brownie mix, swirling the spread through the batter.
8. Pop it in the oven for around 30 minutes. Depending on how deep your tray is the cooking time will vary. I checked mine at 25 minutes and the larger, shallower tray was perfectly cooked while the smaller deeper tray required a further 10 minutes. When checking the brownies remember that if there is an excessive amount of chocolate drops and things in the mix sometimes the skewer will hit that and come out with the gooey chocolate when the brownie itself is cooked so poke a few holes!
9. Let sit in tray for a few minutes before popping on a wire rack to cool. If you just used baking paper you can pretty much just lift the massive brownie out and onto the rack without hassle.
10. Once the brownie is cool enough chop that badboy up! I cut my pieces quite small so that more people have an opportunity to have a taste but you can make them more generous if you prefer.
Enjoy! I want to say be responsible in your brownie eating but during the roadtrip we went through two containers of brownies in the first night and the batch I photographed here was completely gone in under 24 hours so I definitely understand if you devour all the brownies. Honestly.
So that's pretty much that! It's not so hard and in the end you should get a fudgy soft centre and crisp chewy outside and a plethora of pimples on your forehead (at least in my case) but so worth it right? Let me know if you made these and if they work for you. Also feel free to share your weirdest or favourite combination of add ons. For example the Ultimate Sleepover Brownies contain chopped up red frog lollies, peanuts, small cooking marshmallows and popcorn.
xoxo
Lily Pie.


Comments
Post a Comment